I learned this lesson the hard way.
After years of trying to grow my natural nails, I’d finally achieved some length. They looked elegant, feminine, exactly what I wanted. Then I reached for my car keys, slipped, and watched my thumbnail bend backward in slow motion. The crack wasn’t just painful—it was heartbreaking.
That’s when a nail technician friend introduced me to builder gel.
She looked at my sad, broken nail and said something I’ve never forgotten: “You’ve been treating your nails like they’re stronger than they are. Builder gel gives them armor without the bulk.”
Here’s everything I’ve learned about this game-changing product—what it is, how it works, and whether you need it.
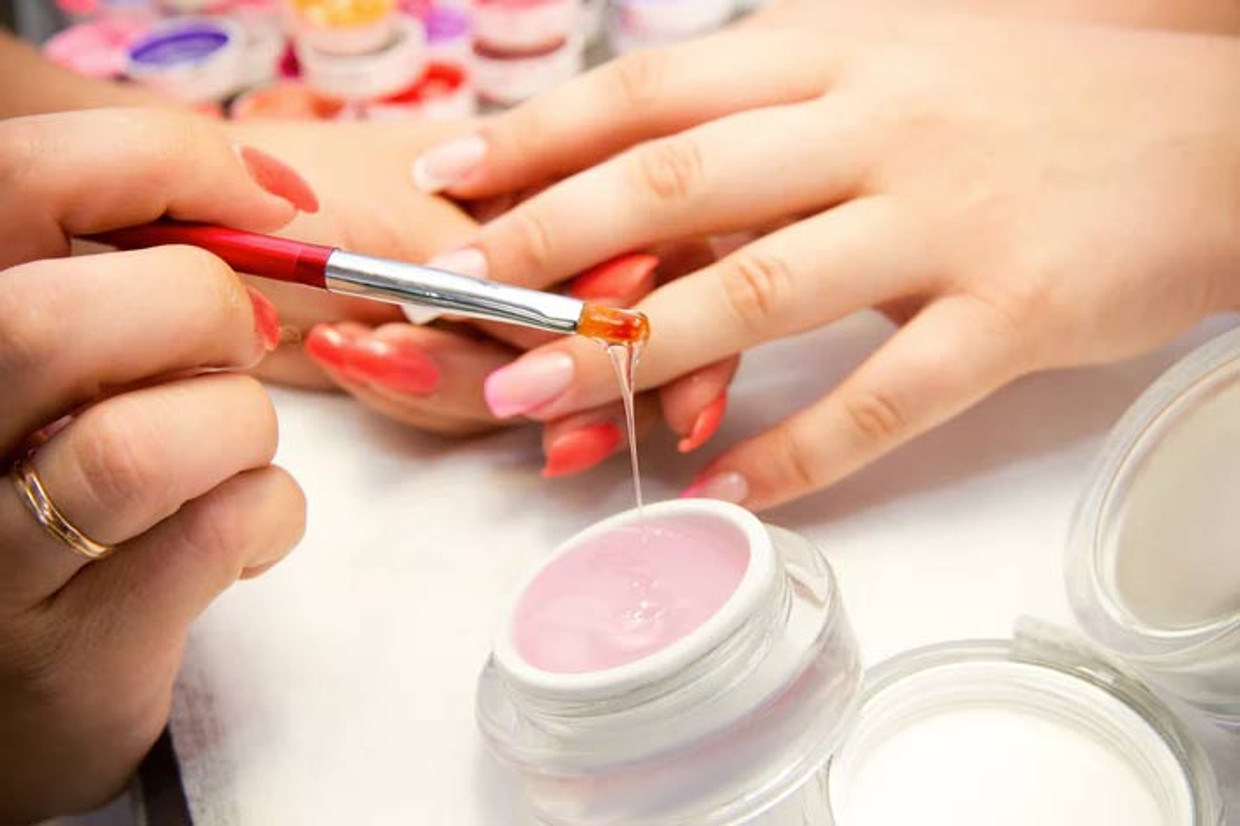
What Actually Is Builder Gel?
Let’s start with the basics.
Builder gel is a thick, viscous gel polish designed to add structure, strength, and length to natural nails. Think of it as the middle ground between regular nail polish and acrylics. It’s strong enough to extend nails but flexible enough to move with your natural nail.
Unlike regular gel polish (which is thin and meant only for color), builder gel is thick enough to build an apex—that’s the raised center section that gives nails structural strength. It self-levels, meaning it smooths out as you apply it, creating a perfect, even surface.
Most builder gels come in pots or bottles and require curing under a UV or LED lamp. They’re available in clear, natural pink, or opaque shades, and can be used as a base for other polishes or worn alone for a natural “my nails but stronger” look.
The Different Types of Builder Gel
Not all builder gels are created equal. Here’s what’s out there:
Hard Gel vs. Soft Gel
This is the biggest distinction.
Hard gel: Cannot be removed with acetone. It must be filed off with a nail drill machine. Extremely durable, perfect for significant extensions, and favored by professionals. Once cured, it’s rock-solid.
Soft gel: Can be soaked off with acetone. More flexible, gentler on natural nails, and easier for beginners to remove safely. Most at-home builder gels fall into this category.

Viscosity Levels
Low viscosity (self-leveling): Runny consistency that smooths itself out. Perfect for beginners because it’s forgiving.
Medium viscosity: Thicker, holds its shape better. Good for building structure and creating extensions.
High viscosity (sculpting gel): Very thick, holds peaks and shapes. Used by professionals for advanced sculpting.
Color Options
Clear: Invisible, works under any polish color.
Pink/nude: Creates a natural “my nails but better” look. Popular for French manicures and natural enhancements.
Camouflage: Opaque shades that completely cover the natural nail. Used when the natural nail is stained or uneven.
Color gels: Builder gel with pigment already mixed in. All-in-one strength and color.
Why Choose Builder Gel?
After using builder gel for two years, here’s why I’ll never go back to natural-only nails:
Your natural nails stop breaking. This is the big one. Builder gel acts as a protective shell. My nails now grow past my fingertips without splitting, peeling, or snapping.
You can finally grow length. If your nails peel or break at a certain length, builder gel provides the structural support they need to keep growing. The gel takes the stress while your natural nail grows underneath.
It’s lighter than acrylics. Acrylics can feel heavy and thick. Builder gel is lighter, more flexible, and feels more like your natural nail.
No nail damage (if removed properly). Unlike acrylics, which require aggressive filing, soft builder gel soaks off with acetone. Your natural nail underneath remains intact.
Perfect for nail biters. If you’ve struggled with biting, builder gel creates a smooth, hard surface that’s unappealing to bite and helps nails grow past the “biting zone.”
Lasts 2-3 weeks. With proper application, builder gel fills last two to three weeks before growth becomes visible.
A nail educator once told me: “Acrylics are like a cast for your nail. Builder gel is more like a really good athletic tape—supportive but flexible.” That analogy has always stuck with me.
How to Apply Builder Gel: Step by Step
Applying builder gel requires patience and practice. Here’s the basic process:
What You’ll Need
- Builder gel (soft gel for beginners)
- UV/LED lamp
- Nail dehydrator and primer
- Base coat (if required by your gel system)
- Lint-free wipes
- Nail buffer and file
- Cuticle pusher
- Isopropyl alcohol or cleanser
Step 1: Prep the Nail
Push back cuticles. Gently buff the nail surface to remove shine. Don’t over-buff—you just want texture for adhesion. Wipe with alcohol to remove dust and oils. Apply dehydrator and primer if your system uses them.

Step 2: Apply Base Coat
Some builder gels require a separate base coat. Follow your product’s instructions. Cure under the lamp.
Step 3: Apply Builder Gel
This is the tricky part. Using a brush, apply a thin layer first, brushing from cuticle to tip. Cure. Then apply a second, thicker layer, building the apex (thickest part) in the center of the nail. Hold the nail upside down for a few seconds to let it self-level before curing.
Pro tip: Start with thin layers. Thick layers generate heat during curing and can burn.
Step 4: Cure Fully
Cure according to your lamp and gel instructions—typically 30-60 seconds for LED, 2-3 minutes for UV.
Step 5: Wipe and Shape
Wipe off the inhibition layer (the sticky residue) with alcohol. Then file and shape your nails. This is where the real magic happens—you can refine the shape, smooth any bumps, and perfect the apex.
Step 6: Add Color or Top Coat
If you want color, apply it now. If you’re wearing the builder gel alone, apply a non-wipe top coat for shine.
Builder Gel vs. Semi-Permanent Nail Polish: What’s the Difference?
This confuses a lot of beginners. Let’s clarify:
| Builder Gel | Semi-Permanent Polish | |
| Purpose | Structure, strength, extension | Color, shine, durability |
| Consistency | Thick, self-leveling | Thin, fluid |
| Layers | 2-3 thicker layers | 2-3 thin layers |
| Strength | Adds significant strength | Minimal strengthening |
| Length | Can extend nails | Cannot extend |
| Removal | Soak-off (soft) or file-off (hard) | Soak-off only |
| Wear time | 2-4 weeks | 2-3 weeks |
| Skill level | Intermediate to advanced | Beginner-friendly |
Think of it this way: semi-permanent polish is like regular clothing—it covers and decorates. Builder gel is like shapewear—it supports, shapes, and structures.
You can absolutely wear semi-permanent polish over builder gel. In fact, that’s a perfect combination: builder gel for strength, semi-permanent for color.
Common Beginner Questions
Is builder gel safe for natural nails?
Yes—when applied and removed properly. The risk comes from aggressive filing during removal or picking/peeling the gel off. Soak-off soft gels are safest for beginners.
Can I use builder gel on short nails?
Absolutely. Builder gel strengthens short nails and helps them grow longer without breaking.
How do I remove builder gel?
For soft gel: file off the shiny top layer, soak cotton balls in acetone, place on nails, wrap in foil, wait 15-20 minutes, gently push off remaining gel. Never pry or scrape.
Will it ruin my nails?
Improper removal ruins nails. The product itself is protective while worn.
Can I do it at home?
Yes, with practice. Start with a soft gel system designed for beginners. Watch tutorials. Expect a learning curve.
The Bottom Line
Builder gel changed my relationship with my nails. For the first time, I can grow them past my fingertips without constantly nursing breaks. They look polished and professional even without color.
Is there a learning curve? Yes. Will your first attempt be perfect? Absolutely not. But once you get the technique down, builder gel becomes the foundation of a stress-free, low-maintenance nail routine.
Your nails do a lot for you every day. Giving them a little structural support? That’s just smart.
Read also: The True Meaning of Beautiful Nails: A Guide to Health and Care

